If your screen looks blurry, too stretched, or things just don’t look right, the display resolution is probably not set correctly. Windows 11 makes it really easy to change it in just a few clicks. Here’s exactly how to do it.
What is Display Resolution?
Display resolution controls how many pixels are shown on your screen. A higher resolution like 1920 × 1080 makes everything look sharper and cleaner. A lower resolution makes things appear bigger but less sharp. Every monitor has a recommended resolution, and sticking to that gives you the best image quality.
How to Open Display Settings
The quickest way to get to display settings is directly from your desktop.
Right-click anywhere on your desktop. A small context menu will pop up with a few options like View, Sort by, Refresh, and others.

From that menu, click on “Display settings”. This will open the Windows Settings app and take you straight to the display options.
The Display Settings Page
Once you click Display settings, you’ll land on the System > Display page. This is where you can control your screen brightness, Night light, resolution, orientation, and more.
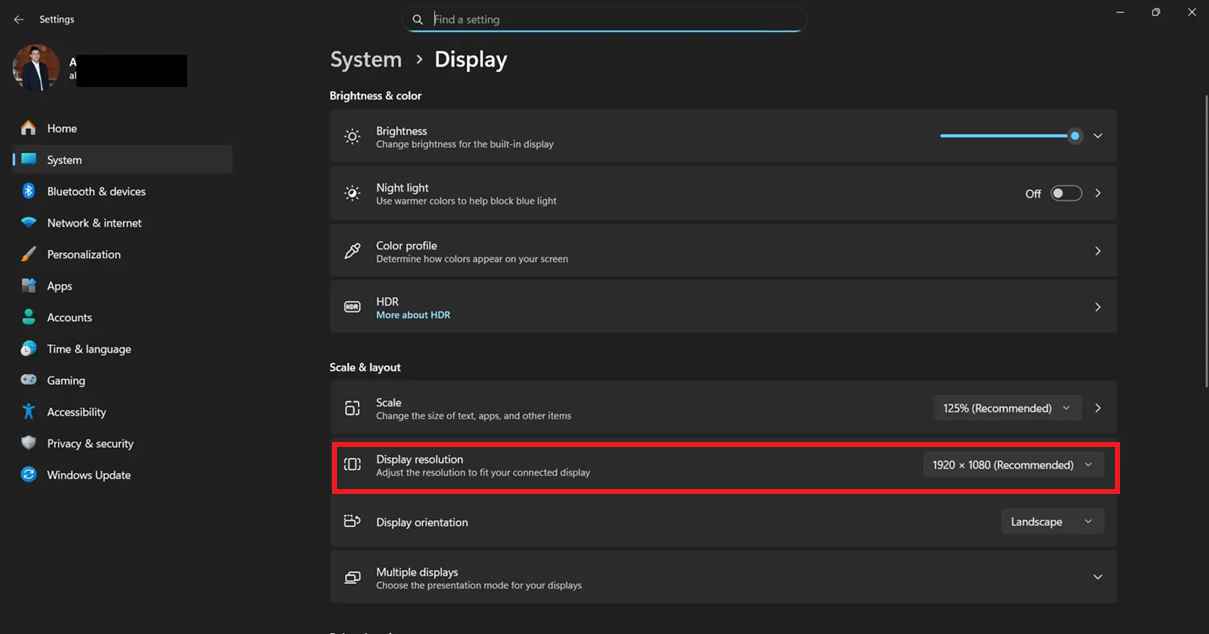
Scroll down a little and you’ll see the Scale & layout section. Right there you’ll find Display resolution showing your current resolution — in this case it shows 1920 × 1080 (Recommended).
Changing the Resolution
Click the dropdown next to Display resolution and a list of all supported resolutions for your monitor will appear.

You’ll see options like 1680 × 1050, 1600 × 900, 1440 × 900, 1280 × 1024, and many more. The one marked “Recommended” is the best fit for your specific display — it’s always a good idea to stick with that unless you have a specific reason to change it.
Click the resolution you want and Windows will immediately apply it and ask you to confirm the change. You’ll have 15 seconds to either Keep changes or Revert back to the previous setting — so don’t worry, if something looks wrong you can easily go back.
Which Resolution Should You Choose?
Most modern monitors and laptop screens work best at their recommended resolution. Here’s a quick guide:
1920 × 1080 (Full HD) is the most common and works great for most 24-inch monitors. 1280 × 720 (HD) gives a lower quality image but makes things appear larger on screen. 1280 × 1024 is common for older square-shaped monitors. If you’re not sure which one to pick, just go with whatever Windows marks as Recommended — that’s the native resolution of your display and it’ll look the sharpest.
Quick Tip
If after changing the resolution everything looks too big or too small even at the right resolution, check the Scale option just above it. Windows sets it to 125% by default on most laptops. You can change it to 100% or 150% depending on your preference.
That’s it! Changing display resolution in Windows 11 takes less than a minute. If you have any questions drop them in the comments below.